Have you ever explored the power of WordPress plugin development?
Do you think it can help your online business or your website?
Have you thought of making some more seeable sales with WordPress plugin development services?
Well, the answers to these and many more questions can surely add a lot to your online businesses. Let us see everything related to custom WordPress plugin development right from basics to advanced tips. You could be a beginner or advanced professional however these steps, as well as tips, will surely add meaning to your knowledge on WordPress plugin development.
Let us know more about this!
Let us start understanding certain basic terms related to WordPress plugin development.
WordPress overrides its core files when it is updated to a new version. As a result, if you manually modify the WordPresscore to add custom functionality to a WordPress site, your modifications will be lost when WordPress is upgraded. This leads to one of the key WordPress development concepts: plugins should be used to add or alter any functionality.
Because PHP is the major scripting language that powers WordPress, a WordPress plugin is essentially one or more functions specified in PHP files. Hooks (action hooks and filter hooks), shortcodes, and widgets are usually included as well. These are the most important aspects of creating a WordPress plugin.
Interested in our Web Design & Development Services?

A WordPress action is a defined activity that will take place at a specific time. You can use actions to extend or modify the functionality of your plugin. When an action is triggered, the functions that are attached to it are executed.
Save post is an example of a WordPress action. The do-action function is used to define actions. They require the $tag parameter (the action's name) and, in some situations, the $args parameter (additional arguments expanding what the action does).
There are dozens of predefined actions in the WordPress core. You can, however, construct your own. In either case, you'll use do action to set values for your hooked function while creating your WordPress plugin.
After that, the add action function will be used to link the function to a specific action.
WordPress filters are hooks that take a single variable or a set of variables and modify them before returning them to the user. In a nutshell, filters allow you to customize the material that people see.
WordPress filters are defined inside the apply filters function, which is used to construct them. They require the arguments $tag (the filter name) and $value (the filtered value or variable), as well as the possibility of using $var for additional function values.
Using the apply filters hook, you can design your own filter. Then you may use the add filter method to run it. This will allow you to attach a function to the filter and manipulate and return the variable.
WordPress widgets are another approach to allow plugin functionality through a simple interface. By extending the WP Widget class, you can make a widget. Widgets in WordPress are designed using an object-oriented approach, which means that functions and values are contained in a single entity called a class.
Simply put, shortcodes are user-facing snippets of code that allow users to develop and show specific functionality to their site's visitors quickly and easily. Shortcodes can be added to posts and pages using the editor, as well as menus and widgets.
Shortcodes are used by several plugins. Using the add shortcode method, you can construct your own shortcode. The first variable will be the name of your shortcode, and the second variable will be the output function. Three values make up the output function: attributes, content, and name.
Now that we've gone over the components of a plugin, it's time to talk about how to develop one. It's vital to remember that you'll need to set up a testing environment or staging site before you can add a new plugin to your website or alter any files. This allows you to explore without worrying about breaking your live site.

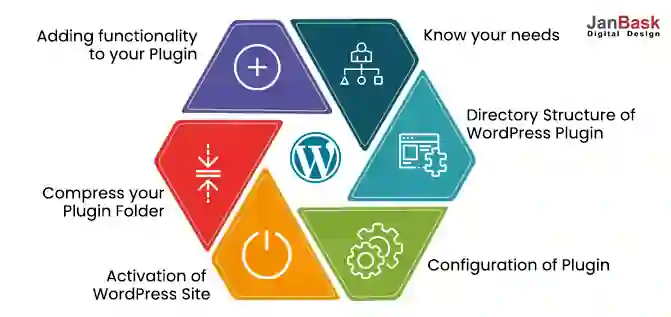
The first step in creating a custom WordPress plugin development is to choose a name for it. You'll want to pick one that is both relevant to the plugin's function and distinct.
It's a good idea to check the WordPress Plugin Directory and do a few Google searches to make sure there aren't any other plugins with the name you're thinking of using. Keep in mind that the name of your official plugin will also be the name of the plugin's folder and a PHP file.
To avoid naming collisions (which we'll explore later), you might want to use an abbreviated version of the plugin's name as a prefix.
As a result, you should pick a name that can be simply abbreviated in order to generate a unique identity.
First and foremost, your plugin requires a home. As a result, after you've decided on a name for your plugin, you'll need to make a folder for it.
To begin, navigate to your WordPress installation's wp-content/plugins folder. Create a new folder called "your-plugin-name," with hyphens between words (i.e., "your-plugin-name"):
After you've created your plugin folder, you'll need to build a PHP file inside of it. You should name your files the same way (for example, "your-plugin-name.php"):
Your plugin may comprise a single PHP file or numerous files, depending on how complex it is.
You might, for example, have distinct files for language, CSS, and so on.
/wp-content/plugins/ is the default WP directory for storing plugin code on the back end. The complexity of your plugin will determine how you organize it within this directory. The directory's name is the same as your plugin's name, but in lowercase and with dashes instead of spaces.
We recommend having a single PHP file (/wp-content/plugins/my-plugin/my-plugin.php) that contains all of the plugin's code. A structure like this is ideal for a simple plugin that performs a single task.
You can organize your plugin based on the function of the code and PHP files if you plan to deal with a plugin that includes a lot of assets.
You can organize your plugin based on the function of the code and PHP files if you plan to deal with a plugin that includes a lot of assets. You can make directories for CSS and JavaScript files, i18n for localization files, templates, and widgets, among other things.
You can create an MVC view under the my-plugin directory for more complicated plugins, with directories for model, view, and controller. This allows for faster debugging later on. We will build the hello-world directory with a single PHP file, hello-world.php, in our simple and straightforward Hello World plugin example.
You'll need to add the file header once you've created your plugin directory and added files to it. The file header is a PHP comment block that contains plugin-specific information. The contents of a sample file header may be found in the WordPress codex.
The file header will display in the list of plugins in your WordPress admin after you've added it.
You've created the foundation for your plugin at this stage. However, it is clear that it does nothing at this time. To do so, use the parts we mentioned earlier in this piece to program your plugin.
There are far too many ways to create and use plugins to cover in a single post. If you need assistance authoring the code for your plugin, we recommend consulting the WordPress Codex.
Keep in mind that various files for your plugin may be required. You could, for example, create separate files for CSS, JavaScript, pictures, and so on.
While this isn't required, it can be quite useful for organizing, especially if your plugin performs multiple functions. If you have numerous files, you'll put them in a compressed folder before uploading them to your website.
As we previously discussed, adding a PHP file to your WordPress plugins directory will automatically add the plugin to your WordPress site. However, you may also use a text or code editor when developing your PHP file and plugin code. This is likely to be one of the most useful WordPress plugin development tools.
You'll need to convert your plugin to.zip format before uploading it to your WordPress site. As a result, when you've finished adding all of the code you wish to include, you can compress the plugin folder. You can normally do this by right-clicking on the folder and selecting Compress.
You can now get to the fun part: using your plugin on your WordPress site once you've finished the first draught. If you haven't yet added it to your WordPress installation, you can do so by going to your plugins directory and uploading the folder (see Step 2 above for more details).
If the plugin is in a.zip folder on your computer, go to Plugins > Add New > Upload Plugin > Choose File: to add it to your WordPress dashboard.
If the plugin was already installed in your WordPress directory, go to the Plugins screen and click the Activate button. Then you may begin testing your plugin and making necessary adjustments and improvements.

Let us help you with some pro tips WordPress plugin development companies generally use. These can help you with the best-in-class WordPress plugin development service.
If you're new to the subject, learning how to become a WordPress developer may seem out of reach. However, because of its approachable style and large, helpful community, WordPress is one of the finest locations to learn development.
Along with that, you have a team of experts from WordPress plugin development companies like ours to guide you through any of the processes.
While there is no one-size-fits-all approach to learning WordPress programming, the following
three steps will get you started:
Do you have any further questions about becoming a WordPress developer? Please post your questions in the comments area below!

Leave a Reply